
Real Estate Photography
Real Estate Photography
Here are some thoughts to consider when photographing your wonderful real estate listings. In fact, to photograph a listing in a stunning way will also help you to gain more and better listings.
Here is some advice:
In Advance
De-clutter all spaces to be photographed
De-personalize all spaces to be photographed
“Clean” the pallet of the space. Remove cords, window air conditioners and any removable distractions.
Use the Right Lens
Corner shots display a room at their largest. Use a wide-angle lens to capture a room as fully as you can.
Consider a wide-angle lens for panoramic shots as well. If the home you are listing has a great panoramic view then do your best to capture it.
Zoom in on details. If your listing has some detailed woodworking or special stonework then zoom in and capture this as well. A zoom lens will do the trick.
Be willing to invest in a couple (or three) lens to make your photo-taking the best it can be.
Discover a WOW! Photo
You always want to have a photo that helps to capture immediate attention for a home. It could be a great view from a patio; a wonderful shot of a blazing fireplace; a dining room view which leads to a view of the living room which could even show the view beyond the living room . . .
Go into the home photo shoot being sensitive and looking for that extra special photo that “opens” the listing to the public. Attract and engage buyers with this WOW! photo.
A WOW! photos could be a corner shot of the great room which will really emphasize spaciousness. Always emphasize spaciousness.
As noted above, take shots from one place that leads to another. For example:
Photograph the dining room as it leads to the living room.
Photograph the great hallway as it leads into the living room.
If there is a patio that leads to a bedroom then be sure that capture how the patio leads into the bedroom.
Use Lighting for Impact
Consider how a property will look at dusk. A high-end home with large windows and exterior lighting can look spectacular at dusk when it is displayed with its interior and exterior lighting.
Also a home that faces the setting sun may have a special look when photographed at sunset that may not be evident when the home is photographed earlier in the day.
Visit your listings multiple times and in different lighting conditions to make sure you capture the home in the best lighting possible.
Use Photoshop
Make your photos they best they can be by using your digital darkroom.
Your Very Own Darkroom – Only Better!
Be willing to experiment after the photo shoot using a photo-editing program. These digital programs are your dark room (only better!).
Here is an idea. A picture in a picture is creative and enables you to display the extra photography work you do. For example, you can show a stone fireplace as it is displayed in the room and show another image that shows the up-close detailed craft-man-ship of the stonework. Buyers will appreciate this extra detail and the home owner will appreciate your attention to detail and commitment to showcase their home.
If you want to capture an interior shot and also the outside view from the room then use a tripod and take 2 shots of the same scene. The first shot should be taken with the camera focus and lighting set for the interior view and a second shot with the focus and camera settings adjusted for the outside view. In your photo editing program combine both shots into one for a picture that is exposed and focused properly for both the inside and the outside.
Here is link to a photo that I took in a arched passageway which was relatively dark. I wanted to take a picture, through the one of the arches, of a church that was in full sunlight. The resulting picture is actually an image that combines two different images. When I was standing in the spot I could see exactly the resulting image but the camera when focused on the church resulted in the archway being underexposed. When I focused on the archway the church was over exposed. Two shots combined resulted in a properly exposed image of both the archway and the church.

Get the Sky Right
Overcast days will probably not provide the best lighting for photographing your listing and could make the property seem dull and uninviting. A sky with bright puffy clouds looks better than a cloudless blue sky. Consider if your listing will be displayed better with a rising sun or a setting sun. Many people love sunsets and if a home has a great view of the setting sun then capture this. The setting sun also can create shadows that can add interest and perspective. The late afternoon sun is also softer and warmer and this can enhance the appearance of a home.
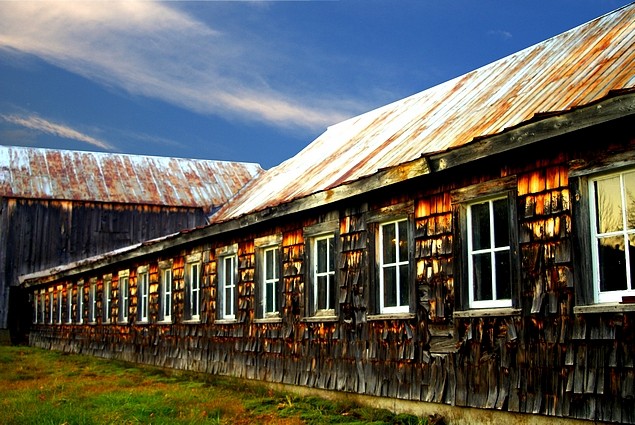
Also, if you cannot get the sky right then I recommend building a collection of sky photos and to change the sky using Photoshop. You never want to improperly represent a property by overdoing it in Photoshop but we all know that the sky changes so to insert your own sky is proper in my opinion.
Take a look at these photos of a photogenic barn near my home. The barn was shot at a single point in time but the sky was shot multiple times and not even at the location of the barn. I inserted different views of the sky into a single photo of the barn.


Be Able To Command a Higher Selling Price
Do a great job with the interior shots – it helps to get a better selling price.
Keep in mind that more photos may also increase time-on-market. Studies have shown this to be true as buyers have more information and ask more question. None-the-less, buyers like photos and sellers like buyers so my advice is to take more photos not fewer.
Develop your skill in taking photos and you may end up with higher than average selling prices and more and high-end listings. Use photography as a differentiator in your marketplace.