
Web Design for Real Estate
10 Essentials of Real Estate Photography
Thomas Russ Arnestad is head of photography in Inviso. He manages several photographers and is a real estate/interiors photography specialist. He wrote a post about the 10 essentials of real estate photography that I am sharing here.
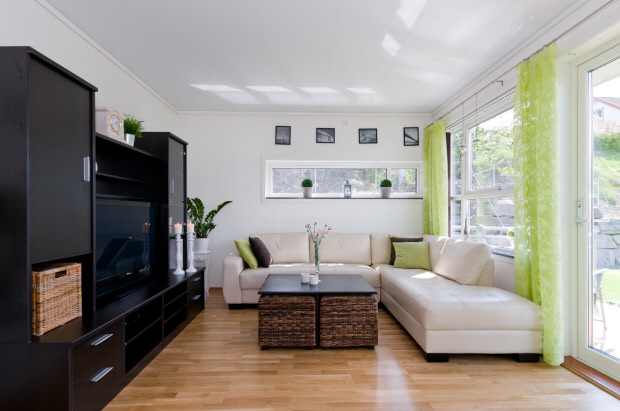
Photos accompanying this post can be found in Thomas’s album.
The 10 Essentials of Real Estate Photography
by Thomas Russ Arnestad (Original Post)
Many people here at G+ have approached me, asking for help on how to successfully start doing real estate photography. After giving it some thought I’ve written up a short guide, which most certainly is not complete, but will take one step further. These are only my thoughts on the topic; others can disagree and be teaching other approaches and I´m not in any position to say which approach is the best, I can only offer the knowledge I’ve inherited through experience.
Mastering real estate photography comes with a lot of training. Through training you will develop routines; routines will make you efficient and through efficiency you are able to make a decent income. This will of course vary across the globe as the markets within this niche differs greatly.
1. What Photography Gear Do You Need?
Like all other kinds of photography gear is always a great object of conversation. In my mind, gear is only tools enabling a connection of the photographers mind, knowledge and ideas, to the output product. Better gear can certainly help you a fair bit, but you won´t capture great photography without the knowledge about how to use your gear.
- SLR camera; you will need the options available to a SLR.
- Lenses; Wide angle lens is a necessity, I use a 16-35mm on a full frame camera being able to capture all kinds of rooms. I also prefer to have a standard zoom lens with low aperture value to get some nice details shots when needed. I use a 70-200mm f/2.8 with stabilizer.
- Tripod; not a necessity but I would highly recommend it to get your compositions sorted well and managing slower shutters without pushing you ISO too far. I prefer to have one with a level tool on the tripod head as well.
- Flashes; I only use speedlights. You will need at least one, preferably 3 or 4.
2. Meeting the Client & Planning the Shoot
When you arrive at the sales object, use the opportunity to look around as much as possible before ringing the door bell and meeting the client. Within a limited time frame, you should be able to identify whether the exterior is ready to shoot or not.
After greeting the owner, suggest that you have a look around the inside of the object before you head out to start by shooting the exteriors. This will give an idea of the whole place, identify things you want the owner to move/clean etc. You then give the owner instructions on what to do meanwhile you start on the outside. This way you will get the most out of your time.
3. Clean Up Your Scenes
Even though you just gave the owner your cleaning-up-instructions you will definitely find yourself in situations where you identify stuff they didn’t move, or simply objects you didn’t see before you´re composing your shot.
The small details are of huge importance to make your images to improve from good to great. You should be able to identity all disturbing details. Examples can be; toothbrushes, toilet brushes, trash bins, ashtrays, shampoos and conditioners, wrinkled bed linen, mismatching towels, fridge magnets etc. I could go on for ages, room by room, but this is something you gotta see for yourself eventually.
4. Height of Camera
The general image should be captured a little bit lower than mid-height of the room, balancing well with the portion of floor and ceiling visible. I shoot at this level to get a little bit more of the floor rather than ceiling, simply because the floors generally are of more interest to a potential buyer than the ceiling is. The doorknobs around the house are generally good pointers to a good height. On the other hand, some rooms demand a different height and I will explain why; in kitchens you would generally want to take a slightly higher stand due to the height of the kitchen bench. You want to show the top of it to create an experienced feeling of space, this also assures you that the bottom of the cupboards (often greasy with blown light bulbs or nasty lights) don´t get unintentional attention. Much of the same goes with bathrooms, slightly higher to “get above” the sink, this makes sure you show the whole room and not just looking straight into the cupboard beneath the sink.
The bedroom is another room where you often find yourself adjusting the height of your camera. With a low bed you might want to go lower too, with a massive bed you might want to go higher, sometimes you have too much visibility underneath the bed etc.
The point is, there´s a general rule (doorknob) but there´s also several rooms that demands a different approach. What you have to think about is that you want to show the whole room, and not lead the viewers eye directly into an “obstruction” in the middle of the room.
5. Straighten Up the Lines and Horizon
In most houses the walls and corners are straight and the images should project this as well.
There are different takes at this, some don´t care to much about it while shooting and straighten up the lines post processing. I´m convinced that it´s less time consuming to take leveled shots while you´re at the task anyway and spend less time in Photoshop. This is where the level tool can come handy; I have one built-in on my tripod head however after some experience you don´t need it Only the exceptions shall be tilted; in example detail shots, photos looking down from 2nd to 1st floor, but it should be a reason for tilting the camera and it should still work with regards to composition.
6. Composition
There´s one thing distinguishing real estate photography from the general interior shot in a lifestyle magazine; information. Information about the rooms and how they´re connected. If a real estate photographer is successful with his/her shots, the viewer should be able to understand how the rooms are connected to each other without seeing any floor plans. Of course, how much you show in each shoot will also depend on your clients preferences. Some wants to show it all, some like to spare something to keep the interest level for viewings up.
You should strive to get the most clean and well-balanced shots while still showing the room in a good way, and get the desired level of information in it. Avoid cropped artwork on the walls, the unintended plant in the corners etc.
To get the most out of the actual space you should try to get 3 walls into the frame rather than showing just a corner. When you bring in a little bit of that 3rd wall, you will open up the room and also tell the viewers more about the actual size, again it comes down to information. If you have an en-suite bedroom you might want to show it together with the bathroom; open the connecting door, place your lights and take the desired position to show exactly what you want.
A rule of thumb with regards to the interior shots of real estate photography is to not shooting straight into the room. While this balances the image well, it´s also kind of dull. You will get better and more informational shots if you take positions to either sides of the room and angle yourself slightly into the room and capture that 3rd wall too. I´m not saying that straight forward shots are always wrong, there are always exceptions, and they tend to work better if there are some kind of graphical elements in the architecture of the room that would be emphasized through your composition.
7. Exposure
When it comes to exposing your shots there are a few things to think about; how light/dark is the final result going to be, how much visibility through the windows are you aiming at, what´s your desired mix between outside vs flash?
Different real estate agents and photographers want different products and your raw image should reflect the final result you´re aiming at. While you´re shooting you´re also lining up the work you need to do post processing. You should try to come as close as possible to the final result while shooting, or at least create a good base file for further editing. As long as you have a well exposed image, most things can be done afterwards.
If you´re shooting an apartment with a “not to desirable neighborhood” you might not want the view to show as much and overexpose the windows so that they turn all white. Just make sure you don´t overexpose too much so that the windows bleeds in and ruin details such as the window frame, curtains etc.
In most circumstances you would actually like to show off the outside view through the windows but this can be real hard with the changing light. This is where your flashes comes handy!
By applying the flashes properly you can expose for the outside light and fill in the interior with flash to get a desirable result. Alternatively you can also shoot bracketed shots to develop an HDR image in post processing.
8. Aperture
I generally use f/8 all the way for my “standard shots” as this gives me a good depth of field and sharpness all way through if your focus is good. There´s nothing wrong about experimenting with lower aperture values but again, it should have a purpose and can work out really good for the detail shots. The problem arises when you forget to check your adjustments and don´t pay attention to your focus point. This will give you an unpleasant surprise as you realize they´re not sharp while post processing. At the moment there´s no way back, but Adobe tells you to not throw away unsharp images as they might have a solution in the future. On the other hand, that doesn’t help you much when the client is expecting his/her files within the next few hours.
Bottom line; pay attention to what you do and you´ll be good!
9. Lighting
As stated under the Gear section I prefer to bring along 3-4 speedlights to leave my options open and being able handle all kinds of light conditions. To use as much as 4 speedlights and not create any cast shadows is quite hard but after doing it for a while you know where and what to look out for. I cannot learn you how to handle up to 4 speedlights in this brief guide, however, if you´re interested in learning more about it I would suggest you look to Scott Hargis who´s a master on the topic and also host workshops around the globe. His situated in the San Francisco Bay area and is a wonderful tutor who I hired to perform two workshops for some of the photographers I manage last year.
10. Post Processing
For me, the post processing is the most boring part about photography but is crucial to serve your clients well. The ways of doing post processing for real estate photography is probably just as many as there are real estate photographers. There are some general things to look out for such as; tuning the exposure, fill light in shadow, recover blown out highlights, setting white balance, level of contrast, color saturation, take care of lens corrections and many more. You have several tools available for doing most these things, Photoshop, Aperture and Lightroom or you can pay other people to do it for you.
What´s important is that you meet your clients expectations. Either those expectations are based on how the client wants the final result to look or that the client initially contacted you to get “your look” on the images. Either way, you have to live up to the expectations.
Finishing Words
These are only meant as guidelines to get started. Once you’ve gotten into real estate photography you will develop your own preferences and also know that all sales objects differ hugely and demands for different approaches.
Hope you get something out of this and wish you the best of luck!
Photography is an essential part of a real estate website. A strong web design for real estate must have a strong focus on photography.